T-Trak is a nifty, small modular standard created by the wife of the man who created the N-Trak standard. It has a pair of parallel mainline tracks towards the front of the module. The benefits of T-Trak is that it sits on a table top, is quick to setup, stores away easily on a typical shelf, and is a most accessible ways to enjoy the model railroad hobby.
While T-Trak layouts are great for shows with their inherent roundy-round orientation, the parallel-mainlines-at-the-module-front standard can be conceptually challenging to making an operational layout at home.
Here’s a quick guide to creating a complete operational shelf layout with two triple-length modules using the T-Trak standard (about 6 feet of length). It incorporates the four elements of a great switching layout: runaround, industries, interchange and staging. Add car cards and waybills, a switch list or other operating method and this type of layout will provide endless hours of train operation in a compact shelf-layout while having the ability to integrate with additional T-Trak modules in a larger layout.
1: Basic Modules
Here we have two basic modules with industries. The industries cannot be served by trains on the front mainline and cars setout on the back mainline block the way of trains. It would not be an exciting stand-alone layout. How do we fix that?

2: The Runaround
Add a runaround. This allows the locomotive to run around cars in order to pick up or drop off at both trailing and facing point spurs. For a stand-alone two-module layout the main tracks become spurs for the industries, staging and a lead track for sorting. Make sure to leave enough room for at least a locomotive, or a locomotive and one or two cars between the turnouts and the end of the modules. See below for dealing with cross-overs between mainlines for T-Trak modules.

3: Adding Spurs
Once we have our runaround we can add spurs for more industries.

4: And More Spurs
There is lots of space on T-Trak modules. Add a few more spurs to add more operational interest.

5: Play With Track Placement
Play with track placement to increase visual interest and use of space. While T-Trak modules have precise track placement for connecting with other modules, you do not need to follow that placement between modules that work together as a set. Moving the track breaks up the straight lines.

6: Connect With Additional Modules
Connect with other modules to add more staging or interchange space. Because we preserved the track placement at each end of our set, we can connect to other modules and expand our layout or play with others.

7: Getting Really Creative
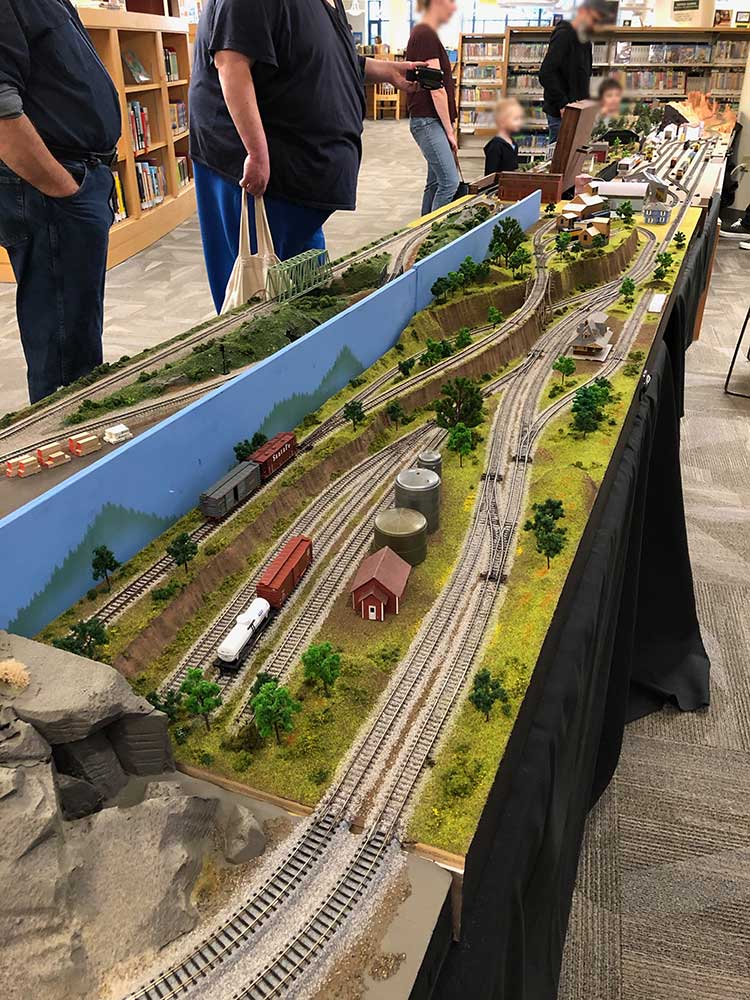
Here we have a rendition of the famous Gum, Stump and Snowshoe layout that conforms to the T-Trak standard. The spur off the back mainline ducks under a bridge, up an incline to a switchback in order to serve a few industries on the hill above.

Making Cross-Overs Between Mainlines for T-Trak Modules
In order to make our module interesting, we want to have cross-overs between mainlines. To keep the modules safe for running with other people’s modules we need to have insulators between the turnouts at each cross-over location. It is good to have a removable barrier for when you want to physically keep trains from crossing over.
Further, we need to be able to change the polarity of the rear track and spurs. For our purposes of a stand-alone home layout we want both mainline tracks to have the same polarity. In T-Trak speak that would be B-W, B-W. But, in order to connect to others we need the ability to go back to B-W, W-B.
While this may seem challenging, it is a lot simpler than it sounds.
Gum, Stump and Snowshoe Module Debut
When we collected our turnouts we had 3 times more of rights than lefts, so we flipped the traditional Gum, Stump and Snowshoe layout and called it the Stump, Gum and Snowshoe. The track was barely laid by the time of our next exhibition so this photo shows the modules without much in the way of scenery, but we were able to do complete operations of 6 industries with a small yard and runaround track. We used flextrack and Peco turnouts with Kato ends for snapping together with other T-Trak modules.
We also tried something new: with five tracks crossing the separation of the two triple-length modules at multiple angles, inclines and elevations, we use two trunk clasp latches (one you can see on the fascia, one behind) and no physical track connection, just butt joints like they do with the Freemo-N modular standard. Trains ran beautifully with no derailments. We routed power from the one powered module to the tracks on the other with a plug connection on the back. The back frame of the module is recessed 1/2 inch to both hide and give room for the wiring and trunk clasp latch.
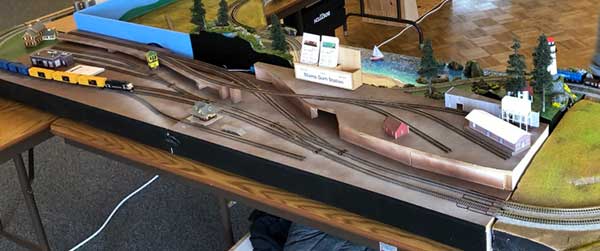
Completed Module on Exhibit